Knowledge Base
Knowledge Base
POS Invoice Printing Setup
Shanon Mulley on September 16, 2013
This article describes how to set up the POS functionality in DecEzy to print receipts/invoices to a POS Printer. When we refer to POS Printers, we are talking about the thermal style printers which supermarkets and other retail outlets use. If you do not have one, or intend on printing your POS invoices/receipts to a normal laser/ink jet printer, then this article will not help you.
Installing The Printer Driver
The first step is to install the printer driver. Most POS printers will come with numerous drivers for the numerous POS standards. These include OPOS, UOPS, and POS for .NET. You do not need any of these to work with DecEzy – only the windows driver is necessary. Most modern POS printers will have a windows driver available – install this and no other drivers.
Setting up DecEzy
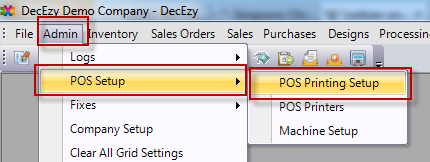
Firstly, open up the Pos Printing Setup window, by selecting Admin>POS Setup>POS Printing Setup.
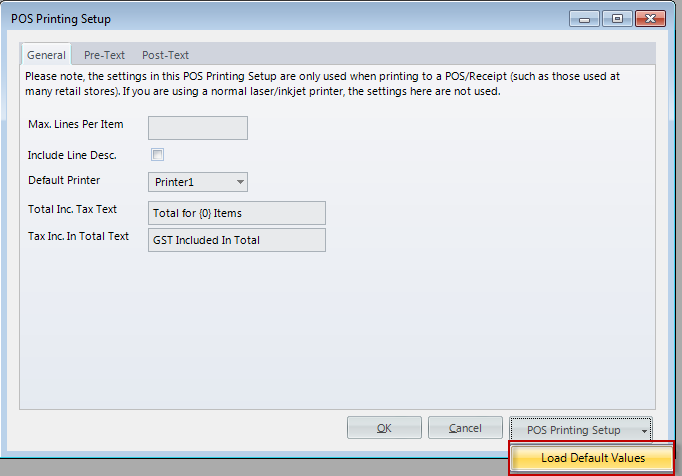
This will look as below:

There are a few things you can set up on the general tab:
- Max Lines Per Item: If an item line on a sale has lots of text (because of a long description, or size/colour information), it will automatically wrap onto the next line. This field controls the maximum number of lines that the wrap will go on for, for any given item line. If left blank, there are no restrictions on the wrapping.
- Include Line Desc.: Determines if the description from the sale is included on the receipt.
- Default Printer: You can set the default printer to print POS Invoices to. This can be overriden at the machine level.
- Total Inc. Tax Text: Determines the text that appears at the end of the invoice. The wildcard {0} will be replaced with the number of items in the invoice.
- Tax Inc. In Total Text: Determines the text that will appear in the tax total line of the invoice.
The details that can be seen above are those that are loaded when the default values are loaded, by selecting POS Printing Setup>Load Default Values.
The Pre-Text tab should look like this:

This contains the text that will appear at the start of the POS invoice, before the details. The details that are shown in the example above are the default values loaded when the user selects POS Printing Setup>Load Default Values.
There are a number of wildcards that can be used in this text, which are detailed at the bottom of the window. For example, {0} will be replaced with the companies ABN. If the companies ABN is 123456789, then "Tax Invoice ABN: {0}" will be displayed as "Tax Invoice ABN: 123456789" on the printed invoice.
The lines can be resorted by dragging and dropping them, so it is easy to put a new line at the start. The "Centre" checkbox can be used to ensure a line is centred on the invoice.
The "Post-Tax" tab is similar to the "Pre-Tax" tab, except the details on this tab are printed after the details (and totals) of the invoice.
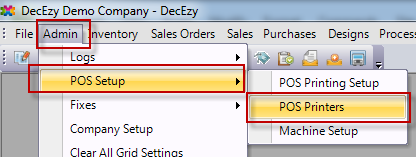
Next the POS Printers are setup. Please note, that this is for the configuration of the kinds of printers you may be using, not the printers themselves. This is opened by selecting Admin>POS Setup>POS Printers:

Here you can set the settings you wish to user with your printer or printers. If you wish to use the same settings on all your printers, you need only set up one line here, and use that setting for all the printers. You only need to set up multiple lines if you wish to use different settings (width/font/font size) on different printers.
The settings you are available are:
- Width: This determines the number of characters that can be printed on the POS invoices. Please note that the system assumes you have entered a realistic width. If you enter a very high number, like 100, the system will attempt to print this, and much of the detail will end up off the paper. The number of characters your printer can print will depend on a number of factors, such as paper width, font, and font size, so some experimentation may be necessary. (more on this later).
- Font Name: This determines what font will be used on POS invoices. A number of fixed width fonts are available in the dropdown as suggestions for what to use, but you can overwrite these options with any font that is installed on your machine. Fixed width fonts should always be used. If you use a variable width font, the aligment of the printed invoice will not look right.
- Font Size: This determines the size of the font used on POS invoices.
The "Text Print" button will send some standard text to the printer, using the font and font size of the current printer setup. This will make it easier for you to determine what font/size you wish to use, and determine how many characters fit on a row.
Next each machine which will be printing POS invoices are setup. Please note, that the rest of steps described are per-machine, and need to be carried out on each machine that will be printing POS invoices.
Open up the POS Machine Setup by selecting Admin>POS Setup>Machine Setup:


As at time of writing, there are two things here to set up:
- POS Printer Setup: This is the printer setup/config you wish to use when printing from this machine (font/font size/ width)
- POS Printer: This is the windows printer that the physical POS Printer is set up as.
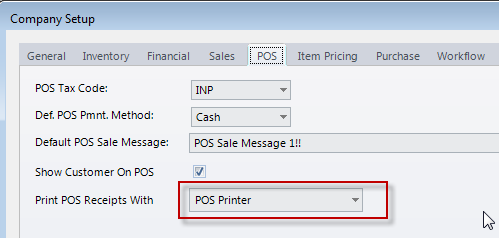
Now there is only one more thing to do – to tell DecEzy that you wish to print to the POS printer by default when printing POS invoices. This is done from the POS tab of company setup, by changing the "Print POS Receipts With" value to "POS Printer"